Laravel 9 - How to Generate Sitemap XML File for SEO
3 minutes read
In this article, I will explain you how to generate sitemap in Laravel app with example. I will share with you step by step how to dynamically generate sitemap in Laravel 9 app. You just need to some step to approach generate sitemap file in Laravel 9.

What is Sitemaps SEO?
Have you ever hear SEO(Search Engine Optimization) before? SEO help ranking your website through indexing on the search engines. There are many factors that help indexing in Google. Adding sitemaps.xml file in website is one of factor that boost website in search engine.
Sitemaps is important for every website because it contains list of URL in your website. Google will looking for sitemaps to crawl and indexing which will enhance ranking in search result, and I will show how to generate sitemaps file in Laravel app.
How to Generate Sitemap XML File
Following steps below to implement generating sitemap in webpage.
- Install Laravel
- Create Article Migration and Model Class
- Create Controller
- Create View
- Adding Route
- Run Laravel App
1. Install Laravel
Suppose you have installed Laravel framework. Read this to know how to install Laravel project.
2. Create Article Migration and Model Class
We will create migration which is contain fields or columns and model. Run command below to create Article table
php artisan make:migration create_articles_table
After run command above, let's go to database -> migrations and update below code
Open file database -> migrations -> 2022_06_11_033722_create_articles_table.php
<?php

use Illuminate\Database\Migrations\Migration;
use Illuminate\Database\Schema\Blueprint;
use Illuminate\Support\Facades\Schema;

class CreateArticlesTable extends Migration
{
    /**
     * Run the migrations.
     *
     * @return void
     */
    public function up()
    {
        Schema::create('articles', function (Blueprint $table) {
            $table->id();
            $table->string('title');
            $table->string('slug');
            $table->string('description');
            $table->timestamps();
        });
    }

    /**
     * Reverse the migrations.
     *
     * @return void
     */
    public function down()
    {
        Schema::dropIfExists('articles');
    }
}
After that run command below to create table and column in database. Make sure you have update .env file for database connection.
php artisan migrate
Then create model Article that we can use eloquent and access fields or columns from table database.
php artisan make:model Article
Open file app -> Models -> Article.php
<?php

namespace App\Models;

use Illuminate\Database\Eloquent\Model;

class Articles extends Model
{
    //
}
3. Create Controller
Now we will create new controller named SitemapsController with artisan command below.
php artisan make:controller SitemapsController
After run command, file is generated and modified as below code. We will get all articles and pass to sitemap.blade.php file and the return value is xml file type. Please see code below
Open file app -> Http -> Controllers -> SitemapsController.php
<?php

namespace App\Http\Controllers;

use Illuminate\Http\Request;
use App\Models\Article;

class SitemapsController extends Controller
{
    public function index()
    {
        $articles = Article::()->all();

        // pass value to sitemap.blade.php
        return response()->view("sitemap",['articles'=>$articles])
        ->header('Content-Type','text/xml');
    }

    public function show($slug)
    {
       // Define logic to show detail page
       // But this case is idle function
    }
}
4. Create View
We have send data from controller to view but the view is not create yet. Let's create new file and name as sitemap.blade.php.
Open file resources -> views -> sitemap.blade.php
<?php echo '<?xml version="1.0" encoding="UTF-8"?>'; ?>
<urlset xmlns="http://www.sitemaps.org/schemas/sitemap/0.9">
    @foreach ($articles as $article)
        <url>
            <loc>{{route('sitemap.show',$article->slug )}}</loc>
            <lastmod>{{ $article->created_at->tz('UTC')->toAtomString() }}</lastmod>
            <changefreq>weekly</changefreq>
            <priority>0.9</priority>
        </url>
    @endforeach
</urlset>
5. Adding Route
Laravel is looking at route where controller point to view (blade).
Open file routes -> web.php
<?php

use Illuminate\Support\Facades\Route;
use App\Http\Controllers\SitemapsController;
/*
|--------------------------------------------------------------------------
| Web Routes
|--------------------------------------------------------------------------
|
| Here is where you can register web routes for your application. These
| routes are loaded by the RouteServiceProvider within a group which
| contains the "web" middleware group. Now create something great!
|
*/

Route::get('/sitemap.xml',[SitemapsController::class,'index'])->name('sitemap.index');
// example: for read detail page
Route::get('/article/{slug}',[SitemapsController::class,'show'])->name('sitemap.show');
6. Run Laravel App
The final step is make sure you have dummy data and let's run Laravel project.
php artisan serve
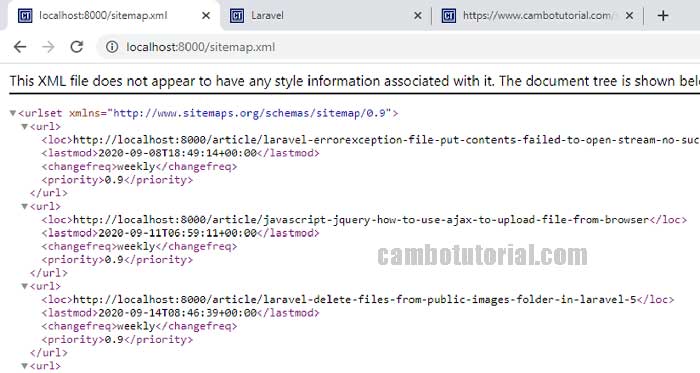
To see the output in browser, goto http://localhost:8000/sitemap.xml

Hopefully it would help you.

Author
As the founder and passionate educator behind this platform, I’m dedicated to sharing practical knowledge in programming to help you grow. Whether you’re a beginner exploring Machine Learning, PHP, Laravel, Python, Java, or Android Development, you’ll find tutorials here that are simple, accessible, and easy to understand. My mission is to make learning enjoyable and effective for everyone. Dive in, start learning, and don’t forget to follow along for more tips and insights!. Follow him
Search
Tags
Popular Articles
-
Laravel 9 Login Multiple Roles using Custom Middleware
15.59K -
Drag Drop File Upload with Dropzone.js in Laravel 8, Laravel 9
13.17K -
Laravel Mail - Laravel 9 Send Email Tutorial Example
11.15K -
How to Generate Dummy Data in Laravel 9
2.73K -
How to Install Laravel 9 PHP Framework
2.22K -
How to Upload File in Laravel 9 with Example
2.18K


