How to Generate Dummy Data in Laravel 9
3 minutes read
Sometimes we need sample data for testing purpose in development mode. Laravel has built-in Tinker which is provide us to create dummy records.
Today I will explain and show step by step how to use Tinker factory, so at the end of this tutorial you can implement and know how to use artisan tinker to produce testing data in Laravel. Without further ado let's get to dive into the topic.
Generate Sample Users
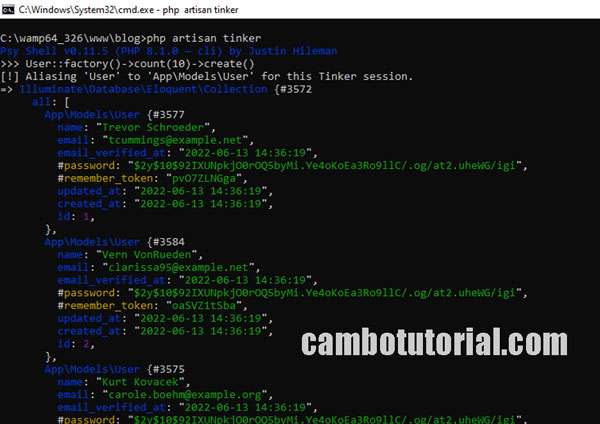
However, by default Laravel application has User model factory, so that we can call a command to generate immediatly without further implement something. See below command to create 10 dummy data users.
php artisan tinker
User::factory()->count(10)->create()

Default file that help generate user data is located following path database -> factories -> UserFactory.php.
How to Generate Custom Sample Records
Following the steps below to completed the task
- Step 1 - Install Laravel App
- Step 2 - Create Model and Migration
- Step 3 - Create Custom Factory
- Step 4 - Generate Sample Records
Step 1 - Install Laravel App
Suppose you have installed Laravel framework. Read this to know how to install Laravel project.
Step 2 - Create Model and Migration
Create Model
In example here we are building Blog App which will have table Aricle to store all articles post and now we are going to create Article Factory, but first we created an Aricle Model as below.
To generate migration at the same time generate the model, you may use the --migration or -m option
php artisan make:model Article -m
Open file app -> models -> article.php
<?php

namespace App\Models;

use Illuminate\Database\Eloquent\Factories\HasFactory;
use Illuminate\Database\Eloquent\Model;

class Article extends Model
{
    use HasFactory;

    protected $fillable = [
        'title', 'slug', 'body'
    ];
}
Update Migration
Open file database -> migrations -> 2022_06_11_033722_create_articles_table.php
<?php

use Illuminate\Database\Migrations\Migration;
use Illuminate\Database\Schema\Blueprint;
use Illuminate\Support\Facades\Schema;

return new class extends Migration
{
    /**
     * Run the migrations.
     *
     * @return void
     */
    public function up()
    {
        Schema::create('articles', function (Blueprint $table) {
            $table->id();
            $table->string('title');
            $table->string('slug');
            $table->text('body');
            $table->timestamps();
        });
    }

    /**
     * Reverse the migrations.
     *
     * @return void
     */
    public function down()
    {
        Schema::dropIfExists('articles');
    }
};
Before run migration command, make sure you have updated database connection in .env file. To run migration by below command
php artisan migrate
Step 3 - Create Custom Factory
Now let's create custom factory to generate sample data as below command:
php artisan make:factory ArticleFactory --model=Article
Then the command will create the file new factory class for Article.
Open file database -> factories -> ArticleFactory.php
<?php

namespace Database\Factories;

use App\Models\Article;
use Illuminate\Database\Eloquent\Factories\Factory;
use Illuminate\Support\Str;

/**
 * @extends \Illuminate\Database\Eloquent\Factories\Factory<\App\Models\Article>
 */
class ArticleFactory extends Factory
{
    /**
    * Define the model's default state.
    *
    * @return array<string, mixed>
    */
    protected $model = Article::class;

    public function definition()
    {
        return [
            'title' => $this->faker->name,
            'slug' => $this->faker->slug,
            'body' => $this->faker->text,
        ];
    }
}
Faker Data Type
Using Faker we can generate by using the following data types:
- Numbers
- Lorem text
- Person i.e. titles, names, gender etc.
- Addresses
- Phone numbers
- Companies
- Text
- DateTime
- Internet i.e. domains, URLs, emails etc.
- User Agants
- Colour
- Images
- Uuid
- Barcodes
- Files
Step 4 - Generate Sample Records
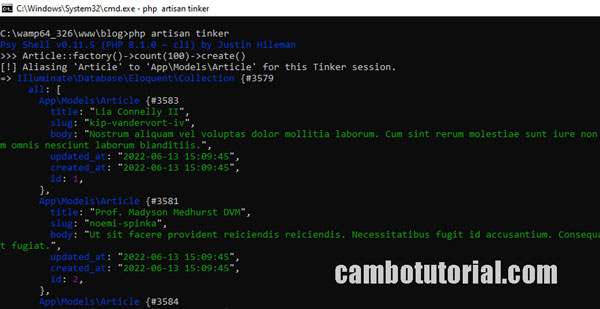
Now we are going to generate sample 100 records of articles table of different title using following command:
php artisan tinker
Article::factory()->count(100)->create()
You will see output as below picture.

That's all hope it would help you. Thank you for read the article, have a nice day!
You might Also Like:

Author
As the founder and passionate educator behind this platform, I’m dedicated to sharing practical knowledge in programming to help you grow. Whether you’re a beginner exploring Machine Learning, PHP, Laravel, Python, Java, or Android Development, you’ll find tutorials here that are simple, accessible, and easy to understand. My mission is to make learning enjoyable and effective for everyone. Dive in, start learning, and don’t forget to follow along for more tips and insights!. Follow him
Search
Tags
Popular Articles
-
Laravel 9 Login Multiple Roles using Custom Middleware
15.59K -
Drag Drop File Upload with Dropzone.js in Laravel 8, Laravel 9
13.17K -
Laravel Mail - Laravel 9 Send Email Tutorial Example
11.15K -
How to Generate Dummy Data in Laravel 9
2.73K -
How to Install Laravel 9 PHP Framework
2.22K -
How to Upload File in Laravel 9 with Example
2.18K


